


|
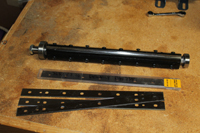
I started with some good pallet wood my neighbor had given me. After truing it up,
I glued it into panels to make the sides of the jointer. A few passes through my planer and
they were nice and straight. I purchased a Dewalt planer head w/ bearings
and two sets of knives off of ebay for $78 for use as the cutter head. The knife sets alone cost
$50 each so that was a really good deal. I also purchased a new 1.5 HP Marathon Motor from
Surplus Center at a great price. The last image is of the cutter head bearing block being
created on my CNC machine.
|


|
The finished bearing block. I bought two serpentine belt type automotive pulleys and fashioned
keyways in them. The smaller one fit on the cutter head perfectly and made a nice crush fit
against the bearing when the nut was tightened. I had to drill the shaft of the motor to take a bolt for the retaining
plate for the larger pulley.
|


|
After drilling, I tapped the hole to take the retaining bolt. A check of the clearance on
the bearing block was good. I then carefully mocked up the assembly to check component placement.
Then I took the front panel, put it on the CNC machine and cut the on/off switch and pulley holes.
|


|
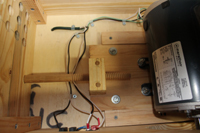
Then I made the motor belt tensioner using the Beall Wood Threader system. I cut out
the adjuster knob and base using the CNC machine. Whoops, I got the dimensions wrong and got the
wrong size belt. The parts store was cool and let me swap it for the right sized one. The motor mounting
and wiring for the switch are shown. The pad the motor is on is locked in place after adjustment by
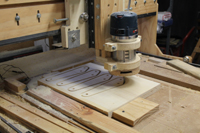
tightening four mounting bolts through the pad out the bottom of the machine. The last picture is the CNC
machine cutting the parallelogram arms for the infeed table adjusting mechanism.
|


|
I began building out the rest of the interior of the machine. Cross braces at the
center where the box is weakest. The dust shields to direct shavings downward are attached to the cross
braces later. The parallelogram is pictured next. It is built with aluminum rods that are pressed into
the mounting strips. The crossbars have half round grooves cut into them and the rods fit into them which
provides even more stability. The adjusting mechanism can also be seen here. The bolts are tightned down to
compress the spring into the hole and lock nut tighted providing a spring tensioning. The last pic is the
fence adjusting bracket.
|


|
Here the infeed and outfeed tables are being made. The edge is scalloped to allow it
to sit close to the cutting blades without hitting. The infeed table is bolted to the parallelogram
using barrel nuts The outfeed table uses the upper bolt to raise and lower the table and the lower nut
then locks it in place. Finally, I can adjust the height of the outfeed table.
|


|
The belt cover is carved on the CNC machine. Meanwhile, I prepped the shavings box
frame pieces and cut grooves to hold eucalyptus panels. I used two nail ends at each joint to keep the
ends from rotating and glued the frame together. Using screws might have split the end wood
|


|
Mortise and tenon frame with the shavings box installed. The CNC machine was set to
engraving the Andrews brand name on the belt cover. Next was creating the fence mounting bracket.
The completed fence was then installed on the machine. I then started on the bearing block for the cutter
head safety assembly.
|


|
The bearings are a press fit into the mounting block. I made a template for the
safety cover and then designed and cut it out on the CNC machine. I fashioned some pucks to create a
pivoting column. The washer rides on one of the bearing surfaces. I also made a neat catch for
the spring to hook on. The finished safety cover assembly with bearings on both sides of the mounting
block.
|


|
The mounted finished assembly. Note the peg is placed through one of the adjustment
holes and then into the top of the triangular shaped spring mount which then holds the cover open the desired amount.
Next came the cable holder. The motor vent holes and tensioner knob are seen on the end of the unit. Finally,
a board that is cupped is run over the jointer. It took three passes, removing the minimum amount to level it
out, ready for the planer.
|

|
| A nice pile of light shavings collected in the box. |


